Hello my dear readers! Well this time around I did a
beautiful red base called Malaga Wine. This has been in my collection since the
beginning. I just love the deepness of it! I was actually just going to go with
the red nails and then I saw my old post (Triangle tips). It made me want to do
something similar with my red nails. I went with horizontal half stripes on the
side of my nails. It doesn’t take too
long to do these kinds of nails, but its just time consuming. And another thing
I see with using tape… when I tend to tape up all my nails and then paint my
nails, I get this tape residue when I remove it. So I guess I have to do this
look nail by nail. I am still new to tape manicures, I used to everything free
hand and it wasn’t always the straightest haha. Practice makes perfect! I drew up a little picture to show you how i placed the tape and where i painted! Have fun!!
Showing posts with label Tutorial. Show all posts
Showing posts with label Tutorial. Show all posts
Saturday, 10 November 2012
Monday, 15 October 2012
Purple Ribbons!
Purple Ribbon Manicure
Today I did another tape manicure but its something that I haven't really tried much. I don't really know the proper name for this manicure so I named it purple ribbons! It reminds me of having small ribbons wrapped around my nails.
I found it pretty easy to do, yet a little time consuming. Luckily I had an afternoon free before I go see Russell Peters!
The colors I used today were OPI- Honk if you love OPI, OPI- pirouette my whistle, Essie- exotic Liras and Essie- Play Date.
So I started off with my light purple base color from Essie (play date), and I waited until it was completely dry. The color itself is extremely beautiful on its own as well.
Once they were dry I cut out small thin triangle pieces of tape and placed them spaced out but one on top of the other. Like below.
Once you have all your tape in place, you are ready to apply your ribbon colors. I used Honk if you love OPI and Essie's Exotic Liras. Remove the tape ASAP, or else your lines wont be crisp. once everything was done and dry i covered it with Pirouette my whistle and finished with my top coat!
Saturday, 13 October 2012
Water Marbling Tutorial
Water Marbling Tutorial
Hello everyone! Today I thought I would add my water marbling tutorial. Originally I had made it as a guest blogger on my great friend Catrinel's blog. Thanks again for letting me show everyone on your blog how to do this! You can check out her amazing blogs at http://www.polishedchronicles.com/
So to start off you would need:
- a small bowl of room temperature water (preferably a bowl you don’t care about because you will get nail polish on the edges of it)
- toothpicks
- q-tips
- chapstick or tape
- your choice of any nailpolishes around 3-4
- nail polish remover
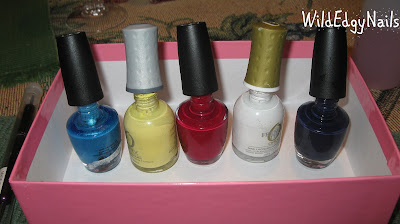
The colors I chose to use:
OPI – teal the cows come home (sparkle blue)
OPI- manicurist of Seville
(red)
OPI- road house blues (dark blue)
Tutorial Step One
Start off with your nails already painted and dried. I chose
white as my basecoat so that the bright colors that I am going to use really
pop out. I chose to only do one nail as my pattern so that it stands out on its
own. Feel free yourself to do as many as you want, you just need to repeat the
steps for each nail.
The thing with water marbling is that you are literally
sticking your finger into a bowl of nail polish. This is where the chapstick or
tape comes in handy. You want to rub it
all over your finger where the skin is exposed so that it is easy to wipe the
nail polish off. If you forget, be prepared for a nightmare. It happened to me
when I first started to do this type of nail art and I spent an hour removing
the nail polish from my skin.
Step Two
So if you haven’t figured it out yet, step two would to be
to apply a generous amount of chapstick to your finger! Don’t forget the back
of your finger as well as under the nail. I have seen this step done with tape
as well. You would tape your whole finger up and leave only the nail exposed.
Another thing you can use is cuticle oil or Vaseline.
Step Three
This is the fun part!
Make sure to have all the caps of your nail polish open so that it will
be easy to access your nail polish fast. You want to do this step a little
quick so that the nail polish doesn’t have time to set on top of the water.
What you will do is take a generous amount of nail polish onto the brush and
drop a bead into the water. You may want to test a few colors out before you
start to see if they easily spread. Some nail polishes are thick and may sink
to the bottom, that won’t be helpful at all. I have had great success with Orly
and OPI, Essie is also a good brand.
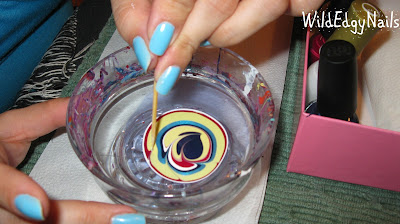
Drop the colors one on top of the other. You should come out
with a ringed pattern, see below.
Step Four
Take your toothpick and start making a pattern. I generally
like to start from the middle to the exterior and see what I get. I have seen
people start from the outside in but in my opinion I find the nail polish dries
fast on the outside and you end up pulling it all into a clump and have to
start over. Starting from the middle I find it’s wet and allows you to work
freely without the clump.
Step Five
Dip your finger into the polish right after you finish
making your pattern. If you wait too long the polish will dry, so make sure you
have your finger covered already! When your nail is under the water you can use
the toothpick and skim the top of the water to remove the excess polish from
the surface. I use a twirling motion and it collects it super fast. When you
are finished doing that remove your nail and flick off the excess water sitting
on top of your nail.
TIP
If you are going to do all your nails don’t forget to really
clean the top of the water. I run my toothpick around it to really make sure I
have collected all the little bits that may be floating on the surface. You
don’t want them floating around for your next pattern.
Step Six
Clean the polish off your skin. I use q-tips or a cotton pad
for a quick wipe, you will figure out what’s an easy way for you with time. For
the hard to reach bits I use an old make up brush dipped in acetone or nail
polish remover and clean them up with that.
Step Seven
Wait a bit before you put your top coat on or your will
bleed the colors together.
Another thing you can do which I show in the pictures is add
dots on the sold spots. It gives it a little pizzazz.
And your done!
Monday, 8 October 2012
Blocking Manicure w/ Tutorial
Blocking Manicure
Hey everyone! Today I did a blocking manicure on myself and if you stick around I will be putting below the tutorial on how you can do one yourself!
What you will need to do this lovely look will be a base-coat, a top-coat, some stationary tape, three different colors of your choice, and an optional nail art of your choice.
I live by my Bonder base-coat. Being a hairdresser I am in the water most of the day and this base-coat helps the polish stick to my nails like glue!!! best invention ever.
So my choice of colors were all from OPI. The pink is called A rose at dawn, the green is Gargantuan Green Grape, and the purple is Funky Dunky from the Shrek line. The silver in the picture is Orly nail art in Silver Sparkle.
To start the look you will need to pick the lightest color of the three. Why, because they usually take up to two coats for full coverage. its just more convenient to do so. Let this color COMPLETELY DRY.
What you will do at this stage is cut out triangle shapes from your tape and place them to expose the desired shape you want. make sure that the tape is pressed down completely so that the polish you are about to put on leaves a nice crisp line when you remove it. You can see by my picture what kind of pattern I was trying to do.
Try and alternate the colors that you chose, placing them in a random pattern. With the nails with only one piece of tape on them you are able to put both colors on.
I did the last colors free hand and just followed the line precise. You should end up with a end result like this.
Now I added some silver over the lines as a finishing touch to my manicure. You don't have to add these if you don't like them. Just make sure you let the colors completely dry before putting on your top coat, or else you will cause smudging. And voila! your done!
Labels:
Green,
OPI,
Orly nail art,
Pink,
purple,
Tape Manicure,
Tutorial
Subscribe to:
Posts (Atom)


