Pages

Showing posts with label blue. Show all posts

Wednesday, 10 April 2013

Eurso Euro...

I quickly did my nails at work yesterday because I was stepping out with my boyfriend and his boss and co-worker for a concert at Place des Arts. We had a great time! There was a cocktail before hand where we had some wine, and before you know it we were ushered in to the hall for the symphony. Even though the singing was in french I really did enjoy the instruments. 

Anyway my classy fingernails were painted Eurso Euro by OPI. 

Check them out! Its such a beautiful color blue! 


Flashy Toes!

Sorry everyone that I haven't posted in a while, I do my nails, take my pictures and then just realize its time for bed and I start that all over again the next day!!!
So I do have a few posts to do today. The first one is a funky Toe Nail design I recently tried. I received some nail glue when I ordered from Bornprettystore.com and I thought that I would glue some jewels to my toes.


The base color that I chose for my toes was Ogre the top blue from OPI. With a name like that you know for sure its from the Shrek line! 
The Rhinestones that I placed on top were dark blue, light blue, pale yellow, pale green and a few silver ones. I dumped out way too many for my toes so I will have to get back to those and separate them. 

Anyway, its great to be back! have a great evening! 


P.S. Sorry for my funny looking toes! I don't usually like to show them! haha

Sunday, 23 December 2012

Christmas Eve Snowflakes!

Hello everyone! so Christmas eve is tomorrow and I just had to get one more manicure in there before the festivities start. With work tomorrow as well as a drive to Ottawa I didn't see where I would be able to do my nails! so these are my holiday nails! 

I had recently asked a fellow nail blogger Anastasia Park to do a tutorial on snowflakes. You can check out her tutorial at http://mymakeupmania.blogspot.ca/2012/12/my-christmas-pedicure-freehand.html.
I tried to mimic what she has showed us to do, but unfortunately I do not have a super fine detail brush. so I was limited to my small lines. So I tried out my own version of the snowflakes. I will be trying these out again in the new year after I go for a run to the art store for a small brush! 

I would like to thank again Anastasia Park for taking her time to do her tutorial especially for me!


Monday, 3 December 2012

Party Blue!!

There's not a lot I can say about this blue except its STUNNING!! The color is from China Glaze with the name Frostbite.  There was a fundraiser at my old hairdressing school for the students to go to New York. They were doing blow-dry's and manicures and my old aesthetics teacher saved this color for me. She knows me too well. I had a blast that night. I added all my nail art the following day myself. Very party-ish nails. The silver sparkles I used reminds me of shimmering diamonds.  These were all out glamour nails! 
what do you prefer for a party?


Friday, 2 November 2012

Miami Beat!


Tonight’s manicure was inspired by the beautiful Miami beaches! Never been there, but I envision the beaches with blue and white towels laying on them. Ah a beautiful sight considering winter is coming here! The weather got so ugly today I wish that I could catch a plane and go lie down on one of my striped towels!  


Thursday, 18 October 2012

Blue Blue Blue

Blue Blue Everywhere!


I didn't quite know where I was headed with this manicure. Its the first time I actually didn't have an idea in my head for my nails. All I knew was that I wanted something with blue. So I started off my manicure with Just Groovy by OPI.


When this was Completely dry I started to add my tape strips. I did the white first and then let it dry, and then did the two blues. (Russian Navy from OPI and Splish Splash from China Glaze) I found that it looked lightly still plain even with the white and blue stripes,so I added a small line of fine silver sparkles. To finish I used one coat of Last Friday Night by OPI's Katy Perry line. 


Saturday, 13 October 2012

Water Marbling Tutorial

Water Marbling Tutorial

Hello everyone! Today I thought I would add my water marbling tutorial. Originally I had made it as a guest blogger on my great friend Catrinel's blog. Thanks again for letting me show everyone on your blog how to do this! You can check out her amazing blogs at http://www.polishedchronicles.com/


So to start off you would need:

  1. a small bowl of room temperature water (preferably a bowl you don’t care about because you will get nail polish on the edges of it)
  2. toothpicks
  3. q-tips
  4. chapstick  or tape
  5. your choice of any nailpolishes around 3-4
  6. nail polish remover

The colors I chose to use:
OPI – teal the cows come home (sparkle blue)
OPI- manicurist of Seville (red)
OPI- road house blues (dark blue)
ORLY- lemonade (yellow)
ORLY – French tip white


Tutorial Step One

Start off with your nails already painted and dried. I chose white as my basecoat so that the bright colors that I am going to use really pop out. I chose to only do one nail as my pattern so that it stands out on its own. Feel free yourself to do as many as you want, you just need to repeat the steps for each nail.


The thing with water marbling is that you are literally sticking your finger into a bowl of nail polish. This is where the chapstick or tape comes in handy.  You want to rub it all over your finger where the skin is exposed so that it is easy to wipe the nail polish off. If you forget, be prepared for a nightmare. It happened to me when I first started to do this type of nail art and I spent an hour removing the nail polish from my skin.

Step Two

So if you haven’t figured it out yet, step two would to be to apply a generous amount of chapstick to your finger! Don’t forget the back of your finger as well as under the nail. I have seen this step done with tape as well. You would tape your whole finger up and leave only the nail exposed. Another thing you can use is cuticle oil or Vaseline.


Step Three


This is the fun part!  Make sure to have all the caps of your nail polish open so that it will be easy to access your nail polish fast. You want to do this step a little quick so that the nail polish doesn’t have time to set on top of the water. What you will do is take a generous amount of nail polish onto the brush and drop a bead into the water. You may want to test a few colors out before you start to see if they easily spread. Some nail polishes are thick and may sink to the bottom, that won’t be helpful at all. I have had great success with Orly and OPI, Essie is also a good brand.
Drop the colors one on top of the other. You should come out with a ringed pattern, see below.
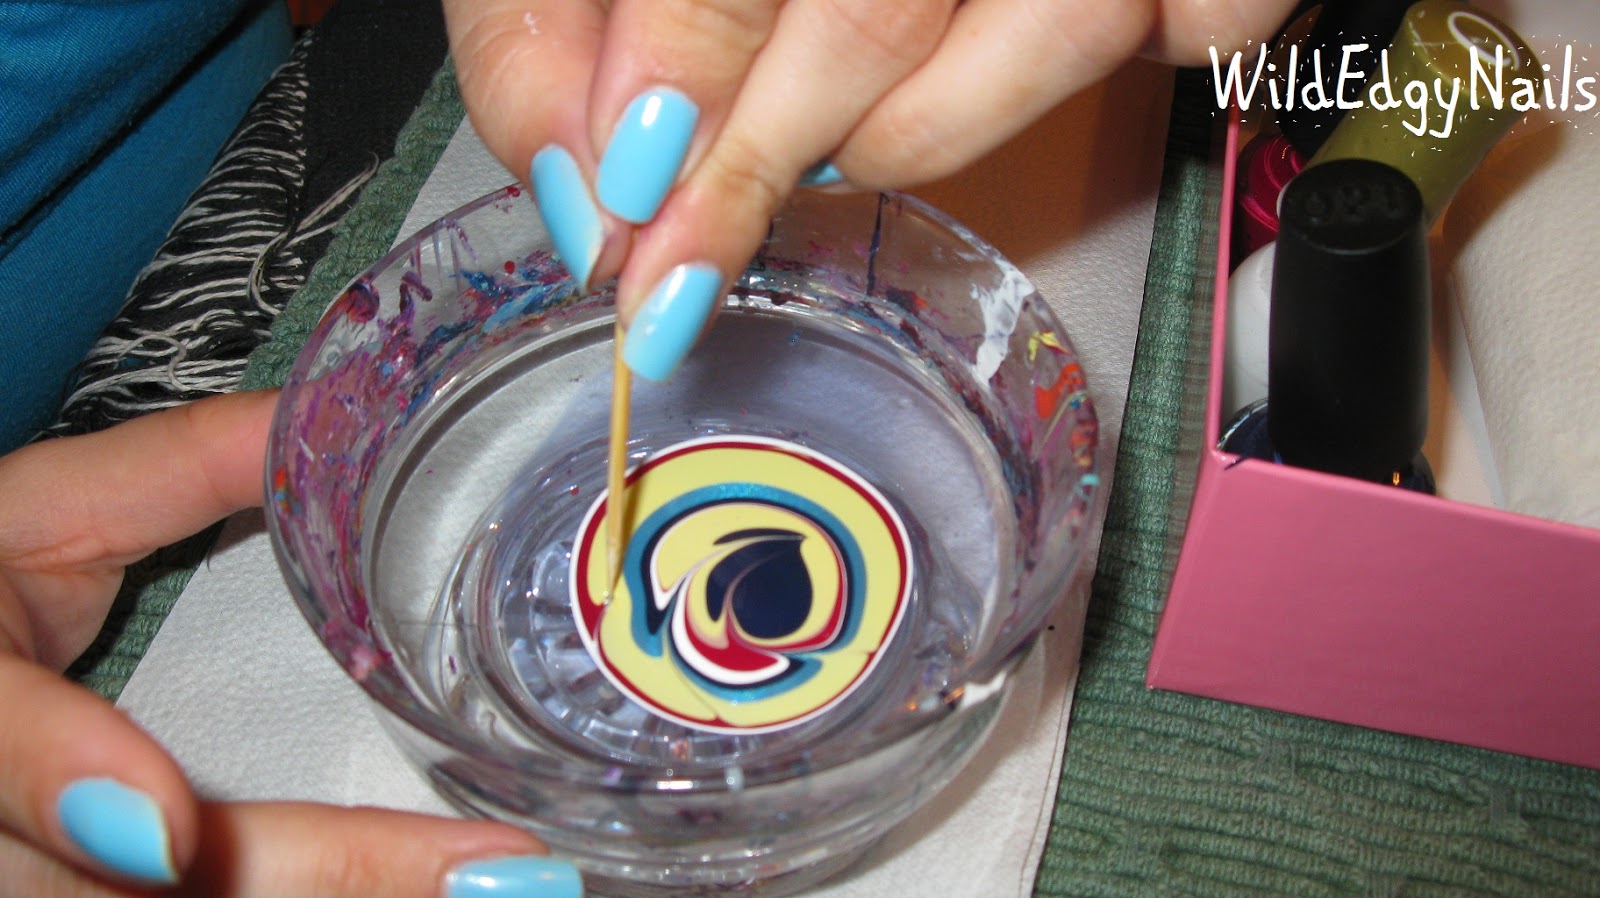


Step Four

Take your toothpick and start making a pattern. I generally like to start from the middle to the exterior and see what I get. I have seen people start from the outside in but in my opinion I find the nail polish dries fast on the outside and you end up pulling it all into a clump and have to start over. Starting from the middle I find it’s wet and allows you to work freely without the clump. 


Step Five

Dip your finger into the polish right after you finish making your pattern. If you wait too long the polish will dry, so make sure you have your finger covered already! When your nail is under the water you can use the toothpick and skim the top of the water to remove the excess polish from the surface. I use a twirling motion and it collects it super fast. When you are finished doing that remove your nail and flick off the excess water sitting on top of your nail. 


TIP
If you are going to do all your nails don’t forget to really clean the top of the water. I run my toothpick around it to really make sure I have collected all the little bits that may be floating on the surface. You don’t want them floating around for your next pattern.

Step Six

Clean the polish off your skin. I use q-tips or a cotton pad for a quick wipe, you will figure out what’s an easy way for you with time. For the hard to reach bits I use an old make up brush dipped in acetone or nail polish remover and clean them up with that.


Step Seven

Wait a bit before you put your top coat on or your will bleed the colors together. 
Another thing you can do which I show in the pictures is add dots on the sold spots. It gives it a little pizzazz.


And your done!

Thursday, 11 October 2012

Aquadelic

China Glaze AQUADELIC

Tonight I tried my new color Aquadelic from China Glaze. It's a creamy color and has a very strong pigment. You can probably get away with just one coat, but being a nail fanatic I always do two. Aquadelic is from the electropop collection which looks fantastic in the summer! I don't know why I am just trying it out now! Its a teal-ish blue which reminds me of the Morrocan oil line for hair! I would definitely recommend this color to any nail color fanatic!


Wednesday, 10 October 2012

Halloween Nails!!!

Halloween Themed Nails!


With the holiday coming up I thought that it would be fun to try out some halloween nails. I have never tried this before and I had so much fun doing this! My good friend Amanda let me paint her nails. A few of the patterns were inspired by others we saw on google. I tried to give them a bit of my own twist. 


These are all the colors that i used to achieve my looks. 5 Orly nail art colors, 3 sparkles, and 7 different colors. 
(from left to right) 
Essie-Vermillionaire, Orly-Green With Envy, OPI-In my back pocket, China Glaze-Splish Splash, OPI- Need Sunglasses, Orly- french tip white, and last but not least Essie-Black onyx.


I started off with just plain basecoats and i worked from there :)