Pages

Showing posts with label Orly. Show all posts

Saturday, 9 February 2013

15 Days of Valentines!! Day 9

Sorry for the delay! My back hurt a lot yesterday and after I was done work so I went to bed early...So this is day 9 of myself and Amanda's 15 Days of Valentines Nails!
What I have for you today is a half pink from CND and half black from Orly... I added hearts on two of my nails and little polka dots on the rest. Cute huh?
Let me know what you think of them!

Wednesday, 9 January 2013

Tape manicure

Hello everyone! So today I have for you a tape manicure done with Orly- miss conduct and wild wisteria. For this look you will paint your nails with your lighter shade, in my case miss conduct and wait till it is completely dry. Usually when I wait I take this time to cut my strips of tape. When my polish is dry I then place my strips of tape where I want them and paint the darker color you choose, my case wild wisteria on top. NOTE: do one nail at a time, I find the tape leaves residue on the nail if left on too long. Make sure to remove the tape as fast as possible so that your lines stay crisp. Wait until dry to apply top coat and then your done!

Unfortunately I won't be making another post for a week and a bit. I'm heading out of town and where ill be doesn't have Internet. But make sure to check back at the end of next week and ill post the minute I'm back!! Have a great week everyone!

Let me know what you think of my nail pattern I always like hearing from you guys. :)

Sunday, 23 December 2012

Christmas Eve Snowflakes!

Hello everyone! so Christmas eve is tomorrow and I just had to get one more manicure in there before the festivities start. With work tomorrow as well as a drive to Ottawa I didn't see where I would be able to do my nails! so these are my holiday nails! 

I had recently asked a fellow nail blogger Anastasia Park to do a tutorial on snowflakes. You can check out her tutorial at http://mymakeupmania.blogspot.ca/2012/12/my-christmas-pedicure-freehand.html.
I tried to mimic what she has showed us to do, but unfortunately I do not have a super fine detail brush. so I was limited to my small lines. So I tried out my own version of the snowflakes. I will be trying these out again in the new year after I go for a run to the art store for a small brush! 

I would like to thank again Anastasia Park for taking her time to do her tutorial especially for me!


Wednesday, 28 November 2012

My Complete Color Collection

I've always wanted to post all my nail polish and I found a perfect way to do so! With my nail swatches! I've listed them all by number corresponding to the photo above the list. Now if my clients wish to get their nails done by me they have an easy way to see what I've got! 
1.Essie- Pale green
2.Orly- Prelude to a kiss
3.Essie- Sew psyched
4.Essie- Fiji
5.Essie- Merino cool
6.Essie- Luxedo
7.Essie- Nice is nice
8.OPI- Miami beat
9.Essie- In stiches
10.OPI- Houston we have a purple
11.OPI- Pompeii purple
12.Essie- Velvet voyeur
13.Essie- Bahama mama
14.Essie- Topless and Barefoot
15.OPI- It's all Greek to me
16.OPI- Diva of Geneva
17.Essie- Tomboy no more
18.Orly- Mirror mirror

1.OPI- The color to watch
2.OPI- Dating a royal
3.OPI- I'm India-mood for love
4.OPI- Lucky lucky lavender
5.OPI- Funky Dunky
6.OPI- Brisbane Bronze
7.OPI- Get in the espresso lane
8.OPI- Suzi loves cowboys
9.OPI- California Raspberry
10.Orly- Luxe
11.OPI- I want to be a lone star
12.OPI- I pink I love you
13.OPI- Kyoto pearl
14.OPI- All Abordeaux
15.OPI- Let me entertain you
16.OPI- Color to diner for
17.OPI- Hot & Spicy
18.OPI- Jade is the new black


1.Orly- Prim and Proper
2.Essie- Silken Cord
3.Essie- Chastity
4.Orly- Purple crush
5.Essie- French Affair
6.Essie-Pretty Edgy
7.Orly- Glowstick
8.Orly- (can't find name)
9.Essie- Coat Azure
10.Orly- Gumdrop
11.Orly- Pixy  stick
12.Orly- Lemonade
13.Orly- Snowcone
14.OPI- Shorts Story
15.Essie- Going Incognito
16.Orly- Fresh
17.Essie- Escapades
18.Orly- Green with envy
1.OPI- Red my fortune cookie
2.OPI- SeƱorita rosalita
3.OPI- Ya'll come back now
4.OPI- Purple with a purpose
5.OPI- Guy meets Galveston
6.OPI- Last Friday Night (Katy Perry)
7.OPI- Charged up Cherry
8.OPI- Too hot pink to hold them
9.OPI- Gargantuan Green Grape
10.OPI- Las Paz-itively hot
11.Essie- Exotic Liras
12.OPI- Just Groovy
13.OPI- Louvre me, louvre me not
14.OPI- Need Sunglasses
15.China Glaze- In the lime light
16.OPI- Strawberry margarita
17.OPI- A Grape Fit
18.OPI- Teal the cows come home 


1.OPI- Cha Ching Cherry
2.Essie- Lights
3.OPI- Do you think I'm texy?
4.OPI- The show must go on
5.OPI- Take the stage
6.OPI- Are we there yet?
7.OPI- Congeniality is my middle name
8.OPI- O'hare & nails look great!
9.OPI- Blue my mind
10.OPI- Cuckoo for this color
11.OPI-lucerne-tainly look marvelous
12.OPI- Yodel me on my cell
13.Orly- Wild Wisteria
14.OPI- French  1/4 for your thoughts 
15.OPI- The one that got away
16.OPI- plugged in plum
17.OPI- In my back pocket
18.OPI- Rising Star 


1.Orly- Here comes trouble
2.Orly-Meet me Under the mistletoe
3.Orly- Androgynie
4.China Glaze- Riveting
5.OPI- Fresh frog from Belair
6.OPI- Save me
7.China Glaze- Luxe & lush
8.Forever 21- Silver sparkles
9.OPI- The living Daylights (007)
10.OPI- Roulette my whistle
11.China Glaze- Electrify
12.OPI- Teenage dream (Katy Perry)
13.Sephora- Only gold for me
14.Sephora- Indi-go with the flow
15.China Glaze- Glitter all the way
16.china glaze- winter holly
17.China Glaze- Electric Beat
18.China Glaze- Cha Cha Cha

1.OPI- Ski till we drop
2.OPI- Don't Socra-tease me
3.OPI- On her majesty's secret service (007)
4.OPI- 1/4 of a century
5.OPI- Deutsch you want me baby
6.OPI- Big hair, Big nails
7.OPI- Chicago Champagne
8.China Glaze- Fuchsia Fantastic
9.OPI- What's with the catitude (shrek)
10.China Glaze- Oh how street it is
11.OPI- Ogre the top blue (shrek)
12.Orly- Liquid Vinyl
13.OPI- Honk if you love OPI
14.OPI- Give me the moon
15.OPI- Alpine snow
16.OPI- Just spotted the lizard (Spider-Man)
17.OPI- Aragon
18.OPI- Malaga Wine

1.China glaze- Optical Illusion 2.China glaze- Liquid Crystal 3.China glaze- Smoke & ashes (hunger games) 4.China glaze- Splish Splah 5.China Glaze- Aquadelic 6.Sephora- I found a pot of gold 7.China Glaze- Make some noise 8.Essie- Play Date 9.China Glaze- Wicked style 10.China glaze- Sexy Silouette 11.Orly-Miss Conduct 12.Orly- Devil may care 13.OPI- Opus in amber 14.China Glaze- Sunshine pop 15.OPI- Glow up already 16.China Glaze- polarized 17.China glaze- Prism 18.China glaze- Radiant
1.Orly- Cant be tamed
2.OPI- My private jet
3.OPI- Don't mess with OPI
4.OPI- Not like the movies (Katy Perry)
5.OPI- Comet loves Cupid
6.OPI- Ali's big break
7.OPI- I eat mainly lobster
8.OPI- Peru-b-ruby
9.OPI- Over the taupe
10.OPI- Tease-y does it
11.Essie- Masquerade belle
12.Essie- Vermillionaire
13.OPI- A rose at dawn
14.OPI- Road House blues
15.OPI- Deer valley spice
16.OPI- Russian navy
17.OPI- Bastille my heart
18.Essie- Limited Addiction  


1.OPI- My address is Hollywood
2.OPI- Significant other color
3.OPI- In the spotlight pink
4.Essie- Barbados Blue
5.Essie- Little brown dress
6.Essie- Good as gold
7.Essie- Steady as she rose
8.OPI- Uh oh roll down the window
9.OPI- It's totally Fort Worth it
10.OPI- manicurist of Seville
11.Essie- Haute as hello
12.OPI- Eiffel for this color
13.China Glaze- Stone cold (Hunger Games)
14.OPI- I break for manicures
15.Essie- St.lucia lilac
16.Essie- Brazilliant
17.Essie- Sand Tropez
18.OPI- Suzi takes the wheel

Friday, 16 November 2012

snowflakes!!!


Pink tips with Miss conduct

Hello hello! God I love the holiday season! And the best thing about the holidays is that there are always new nail color collections coming out!!! I don't tend to buy all of them, only a selective few from each line and today's manicure has a special color I fell in love with from the Orly holiday collection Naughty or Nice, Miss conduct. This beautiful magenta color had a gorgeous holographic sheen to it. I fell in love with it from the start.

So what I did today with my manicure was a very low tip which I cleaned up with a make up brush and acetone so that the line was crisp across. Followed by my Orly nail art in black, white, and silver. I posted a review a few weeks ago about these nail stickers I purchased and I finally took them out to use. I put a little rhinestone on all my fingers except my thumbs. On those I put stars. The only thing I'm not too crazy about is the star edges I still feel. I bet sometime at work when I'm washing hair it will catch and come off. Oh well. I don't keep my mani's on that long anyway. I love to change them. Anyway this is the beginning of my holiday manicures. :) see you all soon!


Saturday, 13 October 2012

Water Marbling Tutorial

Water Marbling Tutorial

Hello everyone! Today I thought I would add my water marbling tutorial. Originally I had made it as a guest blogger on my great friend Catrinel's blog. Thanks again for letting me show everyone on your blog how to do this! You can check out her amazing blogs at http://www.polishedchronicles.com/


So to start off you would need:

  1. a small bowl of room temperature water (preferably a bowl you don’t care about because you will get nail polish on the edges of it)
  2. toothpicks
  3. q-tips
  4. chapstick  or tape
  5. your choice of any nailpolishes around 3-4
  6. nail polish remover

The colors I chose to use:
OPI – teal the cows come home (sparkle blue)
OPI- manicurist of Seville (red)
OPI- road house blues (dark blue)
ORLY- lemonade (yellow)
ORLY – French tip white


Tutorial Step One

Start off with your nails already painted and dried. I chose white as my basecoat so that the bright colors that I am going to use really pop out. I chose to only do one nail as my pattern so that it stands out on its own. Feel free yourself to do as many as you want, you just need to repeat the steps for each nail.


The thing with water marbling is that you are literally sticking your finger into a bowl of nail polish. This is where the chapstick or tape comes in handy.  You want to rub it all over your finger where the skin is exposed so that it is easy to wipe the nail polish off. If you forget, be prepared for a nightmare. It happened to me when I first started to do this type of nail art and I spent an hour removing the nail polish from my skin.

Step Two

So if you haven’t figured it out yet, step two would to be to apply a generous amount of chapstick to your finger! Don’t forget the back of your finger as well as under the nail. I have seen this step done with tape as well. You would tape your whole finger up and leave only the nail exposed. Another thing you can use is cuticle oil or Vaseline.


Step Three


This is the fun part!  Make sure to have all the caps of your nail polish open so that it will be easy to access your nail polish fast. You want to do this step a little quick so that the nail polish doesn’t have time to set on top of the water. What you will do is take a generous amount of nail polish onto the brush and drop a bead into the water. You may want to test a few colors out before you start to see if they easily spread. Some nail polishes are thick and may sink to the bottom, that won’t be helpful at all. I have had great success with Orly and OPI, Essie is also a good brand.
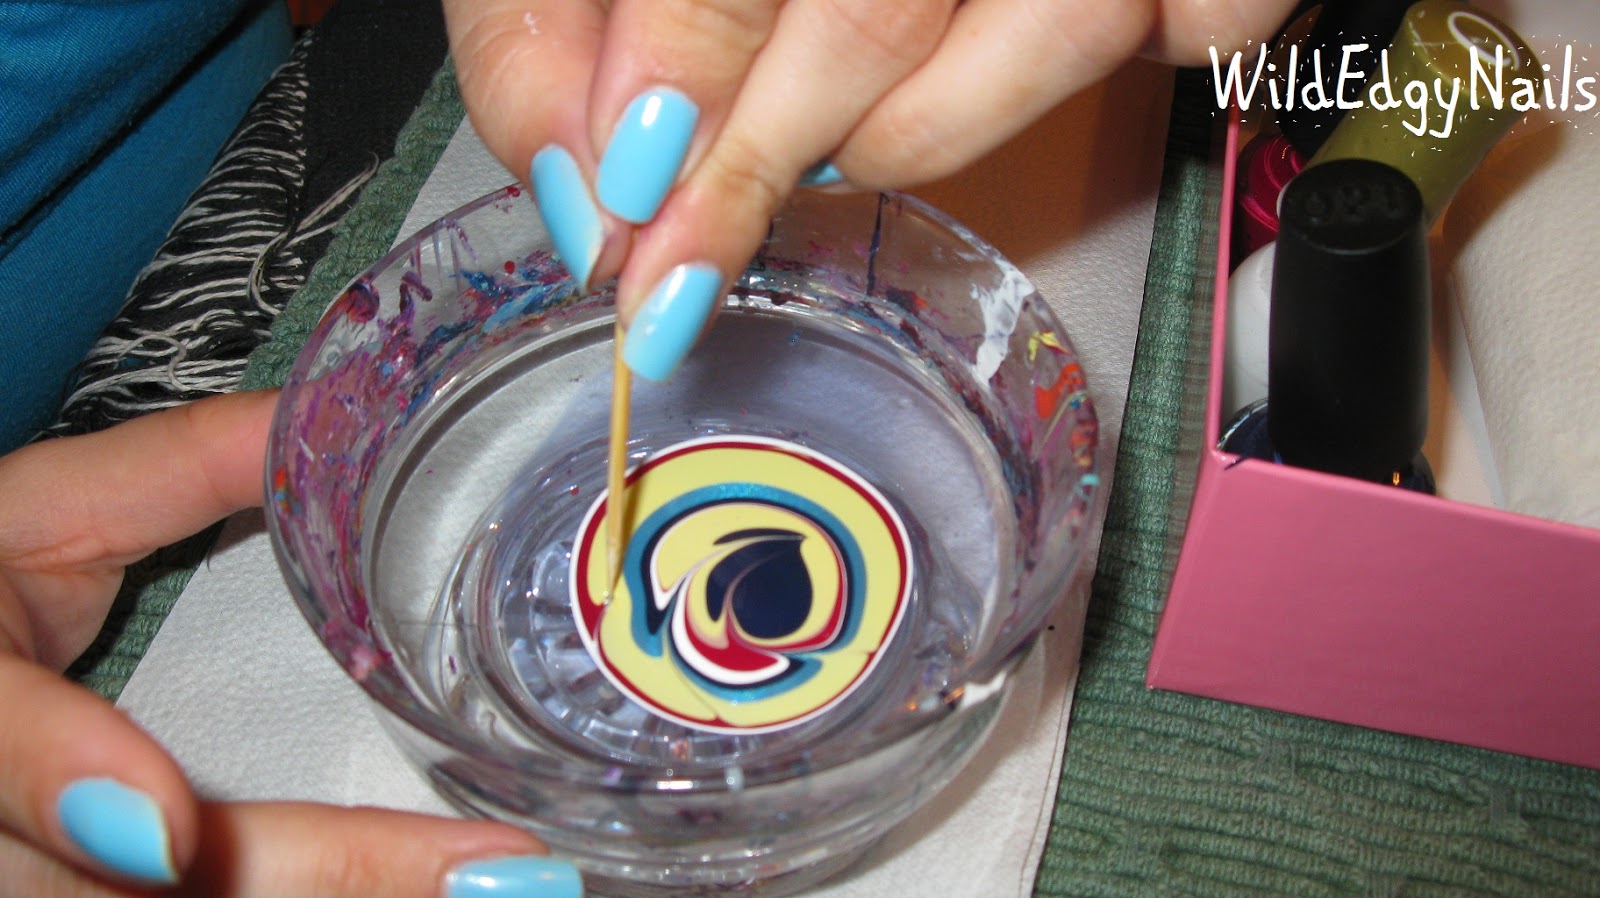
Drop the colors one on top of the other. You should come out with a ringed pattern, see below.


Step Four

Take your toothpick and start making a pattern. I generally like to start from the middle to the exterior and see what I get. I have seen people start from the outside in but in my opinion I find the nail polish dries fast on the outside and you end up pulling it all into a clump and have to start over. Starting from the middle I find it’s wet and allows you to work freely without the clump. 


Step Five

Dip your finger into the polish right after you finish making your pattern. If you wait too long the polish will dry, so make sure you have your finger covered already! When your nail is under the water you can use the toothpick and skim the top of the water to remove the excess polish from the surface. I use a twirling motion and it collects it super fast. When you are finished doing that remove your nail and flick off the excess water sitting on top of your nail. 


TIP
If you are going to do all your nails don’t forget to really clean the top of the water. I run my toothpick around it to really make sure I have collected all the little bits that may be floating on the surface. You don’t want them floating around for your next pattern.

Step Six

Clean the polish off your skin. I use q-tips or a cotton pad for a quick wipe, you will figure out what’s an easy way for you with time. For the hard to reach bits I use an old make up brush dipped in acetone or nail polish remover and clean them up with that.


Step Seven

Wait a bit before you put your top coat on or your will bleed the colors together. 
Another thing you can do which I show in the pictures is add dots on the sold spots. It gives it a little pizzazz.


And your done!

Wednesday, 10 October 2012

Halloween Nails!!!

Halloween Themed Nails!


With the holiday coming up I thought that it would be fun to try out some halloween nails. I have never tried this before and I had so much fun doing this! My good friend Amanda let me paint her nails. A few of the patterns were inspired by others we saw on google. I tried to give them a bit of my own twist. 


These are all the colors that i used to achieve my looks. 5 Orly nail art colors, 3 sparkles, and 7 different colors. 
(from left to right) 
Essie-Vermillionaire, Orly-Green With Envy, OPI-In my back pocket, China Glaze-Splish Splash, OPI- Need Sunglasses, Orly- french tip white, and last but not least Essie-Black onyx.


I started off with just plain basecoats and i worked from there :)


Friday, 5 October 2012

Black and hot pink water marbling

Hello everyone!! So tonight I did a one nail water marbling as my accent nail. As pretty as water marbling is I find it extremely time consuming, a waste of nail polish and it can be a potential mess if not done properly.
Tonight I thought it would it would be awesome to play around with my new china glaze "pool party". I used Essie black and my Orly French tip white as a mix.
I will be posting soon a tutorial on how to do water marbling so stay tuned!!!